Key Takeaways
| What You Need to Know | The Short Answer |
|---|---|
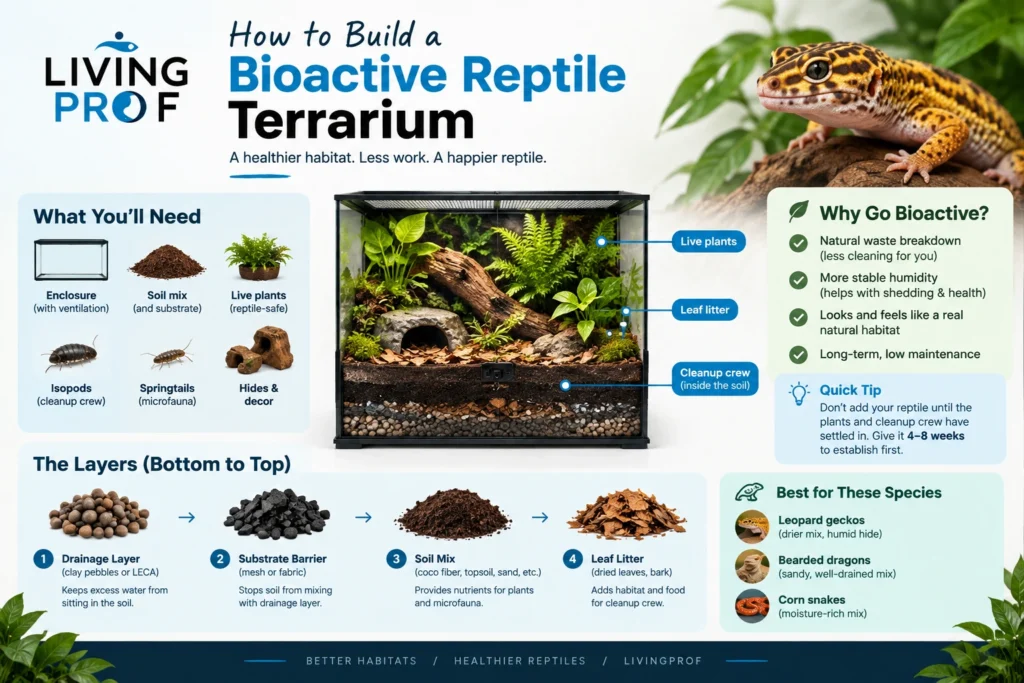
| What “bioactive” means | A live substrate with plants, microfauna, and drainage that breaks down waste for you |
| Best beginner species | Leopard geckos, bearded dragons, and corn snakes all do well |
| Core layers needed | Drainage layer, substrate barrier, soil mix, leaf litter |
| Cleanup crew basics | Isopods and springtails, matched to your species’ humidity needs |
| Time to establish | 4-8 weeks before it’s fully “running” and self-sustaining |
| Biggest mistake beginners make | Adding the animal before the plants and clean-up crew settle in |
| Tools worth using | Tank capacity and equipment guide, reptile feeding schedule |
So you want a bioactive terrarium. Good choice, honestly. I’ve torn down more bare-bones paper-towel setups than I care to admit, and once you go bioactive, it’s genuinely hard to go back. Your enclosure starts looking like a chunk of forest floor instead of a plastic tub with a lizard in it, and your cleanup workload drops off a cliff. But here’s the thing nobody tells you upfront: bioactive isn’t “add dirt and hope.” It’s a small ecosystem, and ecosystems have rules. Let’s get into how to actually build one that works, not one that turns into a mold farm three weeks in.
What “Bioactive” Actually Means (and Why It’s Worth the Effort)
A bioactive terrarium is basically a mini ecosystem living inside your reptile’s enclosure. Instead of spot-cleaning waste every day, you’ve got a living substrate doing that job — plants absorb nutrients, microfauna break down droppings and shed skin, and the whole thing sort of runs itself once it’s dialed in.
Compare that to a standard setup:
- Standard enclosure: paper towel or reptile carpet, manual spot-cleaning, full substrate swap every few weeks
- Bioactive enclosure: live soil, plants, cleanup crew, occasional top-ups, far less full-strip cleaning
IMO, the biggest win isn’t even aesthetics — it’s stability. A properly built bioactive tank holds humidity more evenly than a bare setup, which matters a lot for species prone to shedding issues or respiratory trouble. Check our guide to common reptile diseases and symptoms if you want to see how often poor humidity control is the root cause.
Is bioactive more work upfront? Yes. Is it less work six months from now? Also yes. That trade-off is the entire pitch. You’re front-loading effort so your future self doesn’t have to scrub a tub every Sunday. Worth it? For most keepers, absolutely.
Picking the Right Enclosure and Species for Bioactive
Not every reptile is a great candidate for bioactive, and not every enclosure shape works either. Size matters more here than in a standard setup because you need room for actual soil depth, not just floor space.
Species that tend to thrive in bioactive setups:
- Leopard geckos — arid-leaning, so you’ll build a drier substrate mix with a humid hide zone
- Bearded dragons — need a well-drained, sandy-leaning bioactive mix, not a swampy one
- Corn snakes — do well with moderate humidity and burrowing substrate
- Ball pythons — benefit hugely from bioactive since they’re humidity-sensitive by nature
Still deciding between a couple of species? Our comparison of bearded dragons vs. leopard geckos breaks down which one actually fits your setup and schedule better.
On enclosure choice, glass front-opening terrariums generally beat top-opening tanks for bioactive builds — better airflow control and easier plant maintenance. Aim for as much floor space and depth as your species and budget allow; skimping on substrate depth is the number one reason bioactive setups fail early. Not sure what size you actually need? The tank capacity and equipment guide walks through sizing by species.
Building the Substrate: Layers, Drainage, and Soil Mix
This is where most beginners go wrong, so let’s slow down here. A bioactive substrate isn’t one layer — it’s usually three or four, stacked like a lasagna nobody’s supposed to eat.
The standard layer stack, bottom to top:
- Drainage layer — expanded clay pellets (LECA) or lava rock, roughly 1-2 inches, so excess water has somewhere to go
- Barrier layer — a mesh screen or substrate separator so soil doesn’t clog the drainage layer
- Soil mix — a blend of organic topsoil, coco fiber, sphagnum moss, and sand/clay depending on your species’ humidity needs
- Leaf litter / top dressing — dried leaves, moss, or bark that hold moisture and give your cleanup crew somewhere to forage
Why bother with drainage at all? Because without it, excess water just sits in the soil, and that’s a recipe for root rot and bacterial blooms. Ever seen a bioactive tank that smells sour? That’s usually a missing or undersized drainage layer.
Soil depth matters too — 3-4 inches minimum for most species, and closer to 6+ inches if you’re keeping a burrowing snake like a corn snake. Skip anything with added fertilizers, pesticides, or perlite chunks (some reptiles will eat perlite, and it’s not doing their gut any favors). A simple, chemical-free mix beats a fancy bagged “reptile soil” with mystery additives every time, IMO.
Setting Up Lighting, Heat, and Humidity Gradients
Plants need light. Reptiles need heat gradients. These two requirements don’t always line up neatly, and that’s honestly the trickiest part of a bioactive build.
You’re aiming for:
- A basking zone with proper heat and UVB for your species
- A cooler zone on the opposite end for thermoregulation
- Plant lighting strong enough to keep live plants alive, not just decorative silk ones
- A humidity gradient, achieved through misting frequency, ventilation, and substrate moisture
Full-spectrum LED plant lights paired with a separate basking bulb usually works better than trying to make one fixture do everything. Plants near the basking spot will dry out fast, so cluster your hardier, drought-tolerant species there and save the moisture-lovers for the cooler, shadier corners.
Humidity is a daily-check item, not a set-and-forget one, at least for the first month. A digital hygrometer and thermometer combo is non-negotiable here — guessing humidity by eye is how tanks end up either bone-dry or dripping wet. This part genuinely trips people up: a tank can look damp on the surface while the deeper soil is bone dry, or vice versa. Stick a finger a couple inches down occasionally; don’t trust the top layer alone.
Choosing Plants and Hardscape That Won’t Get Destroyed
Here’s a fun lesson I learned the hard way: reptiles are not gentle with plants. Bearded dragons dig. Ball pythons flatten anything in their path. Pick plants that can take a beating, not delicate ones you saw in a terrarium aesthetic post online.
Hardy plant options by moisture need:
- Low humidity: haworthia, snake plant, aloe (small varieties)
- Moderate humidity: pothos, dracaena, ZZ plant
- High humidity: pothos again (it’s genuinely everywhere for a reason), ferns, peperomia
Always double-check that a plant is non-toxic to your specific species before it goes in — this step gets skipped more than it should.
For hardscape, cork bark, grapevine, and slate rock all hold up well and give your reptile places to climb, hide, and bask at different heights. Layer your hardscape before you finish planting; it’s much easier to build height and structure first, then tuck plants around the edges, rather than fighting around rocks you’ve already placed.
One more thing — leave open floor space. A tank crammed wall-to-wall with plants looks great in photos but gives your reptile nowhere to actually move or bask properly. Function first, aesthetics second.
Introducing and Maintaining Your Cleanup Crew
This is the part that actually makes it “bioactive” rather than just “a terrarium with plants in it.” Your cleanup crew — usually isopods and springtails — are the janitorial staff breaking down waste, shed skin, and dead plant matter.
Common cleanup crew pairings:
- Dwarf white isopods — fast breeders, tolerate a range of humidity
- Powder orange or powder blue isopods — hardier, good for drier setups
- Springtails — nearly always included regardless of species, since they handle mold and fungal growth
Add your cleanup crew 3-4 weeks before introducing your reptile. This gives the colony time to establish without your animal accidentally eating the entire founding population on day one (yes, this happens, and yes, it’s frustrating to restart).
Feed the colony a pinch of fish flakes or blanched vegetables every week or two while they’re establishing — after that, they’ll largely live off the waste your reptile produces. If you notice isopod numbers crashing, check your humidity and temperature gradient first; that’s the usual culprit, not disease.
Feeding, Monitoring Health, and Avoiding Common Mistakes
A bioactive tank doesn’t mean you stop paying attention — if anything, you need to watch it a bit more closely at first, since problems can hide in the plants and substrate instead of sitting in plain view.
Mistakes I see constantly:
- Adding the reptile before the tank has cycled (give it 4-8 weeks minimum)
- Overfeeding, which overwhelms the cleanup crew and causes odor
- Skipping quarantine for new plants, which can bring in mites or pests
- Ignoring gut-loading and supplementation because “the plants will handle nutrition” — they won’t
Track feeding on a proper schedule rather than winging it; our reptile feeding schedule tool makes this easier, especially once you’re juggling plant maintenance on top of feeding days. Also worth bookmarking: the reptile food safety checker, since bioactive setups sometimes tempt keepers into feeding “found” bugs or plant matter from the tank itself, and not everything growing in there is safe.
If your reptile starts showing lethargy, odd shedding, or appetite loss, don’t assume it’s “just the new tank adjusting.” Cross-reference symptoms against our common reptile diseases and treatment guide early rather than waiting it out.
Long-Term Maintenance: What Bioactive Actually Saves You From
Once your bioactive tank is running, the day-to-day workload really does drop. That’s the whole point, right?
What ongoing maintenance actually looks like:
- Weekly: mist as needed, check hygrometer/thermometer readings, glance at plant health
- Monthly: trim overgrown plants, top up leaf litter, check drainage layer isn’t overloaded
- Every few months: top up soil depth if it’s compacted down, check cleanup crew population is stable
Compare that to a bare-bottom setup, where you’re doing a full substrate change every couple of weeks. That’s a real time savings, not just a marketing line.
One thing worth flagging honestly: bioactive doesn’t mean zero cleaning, ever. You’ll still remove large waste on sight for hygiene reasons, especially in snake enclosures like a ball python setup, even though the cleanup crew handles most of the breakdown. Think of it as reduced maintenance, not eliminated maintenance.
For a broader library on getting the equipment side right — filtration and heating aren’t reptile-only concerns if you’re running a mixed reptile-and-aquarium setup — our reptile category hub rounds up care guides across species.
Frequently Asked Questions
How long does a bioactive terrarium take to establish before adding a reptile? Give it 4-8 weeks. The cleanup crew and plants need time to settle before they’re ready to handle a full-grown animal’s waste output.
Can I convert an existing bare-bottom enclosure into a bioactive one? Yes, though you’ll need to fully strip and rebuild the substrate layers. It’s not something you can just add on top of existing substrate.
Do I need CO2 or special plant fertilizer for a reptile terrarium? No — that’s more of a planted aquarium concern (see our CO2 systems guide if you’re also running a tank). Terrarium plants generally do fine on ambient light and the nutrients from the soil and waste breakdown.
Why do my plants keep dying in my bioactive setup? Usually it’s a lighting mismatch — either not enough light for the species you chose, or placing a moisture-loving plant too close to a basking bulb.
Is bioactive safe for baby or juvenile reptiles? Generally it’s better to start juveniles in a simpler setup and move them to bioactive once they’re established feeders, since substrate impaction risk is higher in very young animals.
What’s the difference between isopods and springtails, and do I need both? Isopods handle larger waste and decaying matter, while springtails control mold and fungal growth on a smaller scale. Most successful setups run both together.