Buying aquarium gear that’s the wrong size is one of those mistakes that doesn’t show up right away. Your tank looks fine for a few weeks, then your fish start gasping at the surface, or your heater runs nonstop and never quite hits temperature. Sound familiar? Here’s the thing — most equipment problems aren’t about buying bad gear, they’re about buying the wrong size gear for the tank you actually have.
I’ve swapped out more undersized filters and heaters than I care to admit over the years, so let’s walk through exactly how to size everything properly, gallon by gallon.
Key Takeaways
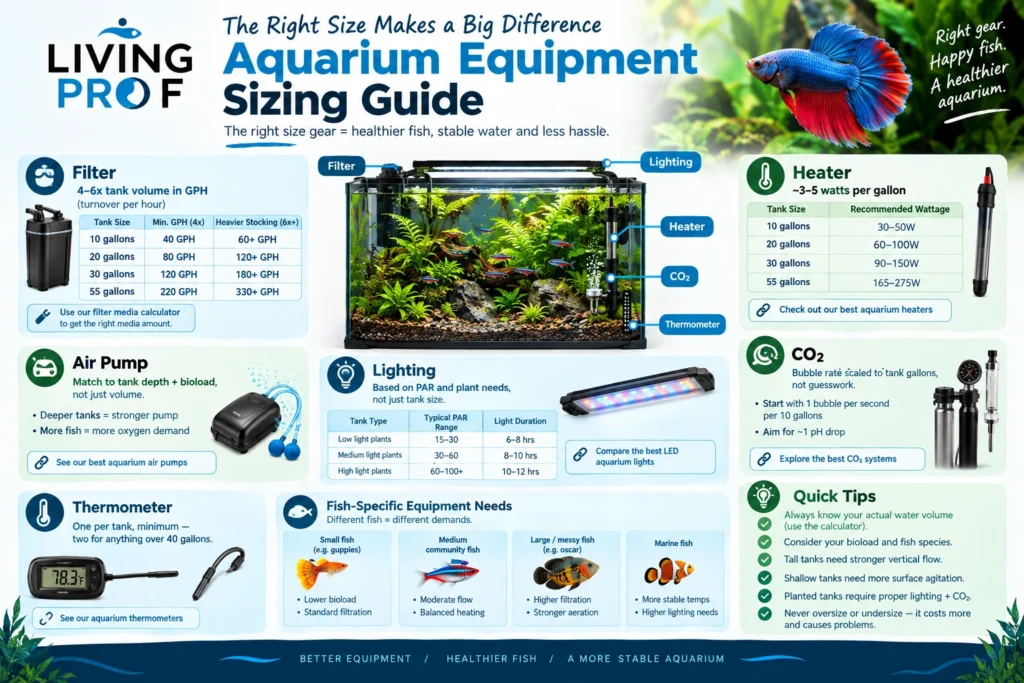
| Equipment | Sizing Rule of Thumb | Quick Tool |
|---|---|---|
| Filter | 4–6x tank volume in GPH (turnover per hour) | Filter media calculator |
| Heater | ~3–5 watts per gallon | Best aquarium heaters |
| Air pump | Match to tank depth + bioload, not just volume | Best aquarium air pumps |
| Lighting | Watts/PAR based on plant needs, not fish | LED lighting comparison |
| CO2 | Bubble rate scaled to tank gallons, not guesswork | Best CO2 systems |
| Thermometer | One per tank, minimum — two for anything over 40 gallons | Aquarium thermometers |
If you’re not even 100% sure how many gallons your tank actually holds (be honest, a lot of people guess), run it through the fish tank volume calculator before you buy anything. Every single sizing rule below depends on that one number being right.
Why Your Tank’s Size Decides Everything About Your Gear
Here’s something nobody tells you when you buy your first tank: the gallon number on the box is basically the master key to every equipment decision you’ll make after that. Filter GPH, heater wattage, light output, CO2 bubble rate — it all traces back to volume.
The mistake most beginners make is buying gear based on the tank’s footprint (how big it looks on the shelf) rather than its actual water volume. A tall, narrow 20-gallon tank behaves very differently to a shallow, wide 20-gallon tank. Same volume, totally different equipment demands, because surface area for gas exchange isn’t the same.
There’s also a bioload factor that a lot of sizing charts conveniently ignore. A 30-gallon tank stocked with a school of tiny guppies needs way less filtration muscle than a 30-gallon tank housing a single, waste-producing oscar. Volume gets you in the right ballpark, but what’s actually swimming in there fine-tunes the number.
A few things worth checking before you size anything:
- Actual water volume (not the box number — substrate, decor and displacement all eat into it)
- Bioload — messy eaters and big fish need more turnover
- Tank shape — tall tanks need stronger vertical flow, shallow tanks need more surface agitation
- Planted vs. unplanted — plants change your lighting and CO2 math completely
Get these four things sorted first and the rest of this guide is honestly just plugging numbers in. Skip them and you’ll be second-guessing every purchase.
Filters: Matching Flow Rate to Your Tank Volume
Filters are where most people either massively overspend or dangerously underbuy, and it’s usually because they’re only looking at the tank size printed on the filter box instead of the actual turnover rate.
The standard rule most experienced keepers use: aim for 4 to 6 times your tank’s total volume in gallons per hour (GPH). So a 20-gallon tank wants a filter rated somewhere between 80–120 GPH. Heavily stocked tanks, or tanks with big messy fish, should sit at the top of that range — or above it.
Here’s a rough breakdown:
| Tank Size | Minimum GPH (4x) | Heavier Stocking (6x+) |
|---|---|---|
| 10 gallons | 40 GPH | 60+ GPH |
| 20 gallons | 80 GPH | 120+ GPH |
| 40 gallons | 160 GPH | 240+ GPH |
| 75 gallons | 300 GPH | 450+ GPH |
Don’t just trust the “up to X gallons” label on the box either — those numbers are often optimistic best-case figures written by marketing, not the actual flow rate you’ll get once media builds up inside. If you want a proper deep dive on which units actually deliver, the best aquarium filters for freshwater and reef tanks roundup breaks down real-world performance instead of box claims.
One thing that trips people up: bigger isn’t automatically better here. Oversizing a filter on a tank with delicate, slow-swimming fish — bettas are the classic example — can create current so strong they struggle to swim normally. IMO, that’s a sneaky mistake even experienced keepers make, chasing “more filtration” when what they actually needed was a spray bar or flow deflector instead.
If you’re running a heavily planted setup or a tank with bottom-dwellers like corydoras, pay attention to media capacity too, not just flow. The filter media calculator is a genuinely useful tool for figuring out how much biological media you actually need to support your bioload — most people massively under-fill their media baskets and wonder why their ammonia readings won’t behave.
Heaters: Getting the Wattage Right for Every Gallon
Heaters are deceptively simple on paper and genuinely tricky in practice. The go-to formula is 3 to 5 watts per gallon, with colder rooms or bigger day/night temperature swings pushing you toward the higher end.
Quick reference:
| Tank Size | Standard Room | Cold Room / Unheated House |
|---|---|---|
| 10 gallons | 30–50W | 50W |
| 30 gallons | 100–150W | 150W |
| 55 gallons | 200W | 250–300W |
| 100 gallons | 300W | 400W+ |
For anything over roughly 40 gallons, I’d genuinely recommend splitting your heating across two smaller heaters rather than one big one. Why? Two reasons. First, if one fails (and they do — ask anyone who’s lost a heater at 2am), you’re not left with zero heat. Second, heat distributes far more evenly across a large tank with two heat sources instead of one hot spot.
Species matters here too. Discus need consistently warmer, more stable temps than your average community tank, so undersized or unreliable heaters are a much bigger deal for them than for, say, a coldwater setup running subtropical fish that barely need heating at all.
Placement matters almost as much as wattage — a heater tucked in a corner with no flow across it will cook the water right next to it while the rest of the tank stays cold. Position it near your filter outflow so the heated water actually circulates. And honestly, don’t cheap out here; a failed heater is one of the fastest ways to lose an entire tank overnight. The best aquarium heaters, tested and reviewed piece covers which models actually hold temperature accurately versus which ones just look good on paper.
Pair whatever heater you land on with a second, independent thermometer — never trust the heater’s built-in display alone. More on that below.
Air Pumps: When Your Tank Needs Extra Oxygen
Air pumps confuse people because filters already move water, so surely that’s enough oxygen, right? Not always. Filtration moves water, but surface agitation is what actually drives gas exchange — oxygen in, CO2 out — and tall or densely stocked tanks often don’t get enough of it from filtration alone.
Sizing an air pump isn’t purely about gallons — depth and stocking matter more:
- Shallow, lightly stocked tanks: often don’t need a dedicated air pump at all if the filter output already breaks the surface
- Tall tanks (18″+ deep): benefit from an air stone near the bottom to push oxygenated water upward
- Heavily stocked or warm-water tanks: warm water holds less dissolved oxygen, so tanks running warmer (discus, some monster fish setups) need more agitation, not less
- Planted tanks running CO2: this is the exception — too much surface agitation off-gasses your CO2 before plants can use it, so pumps often get turned off or timed to run only at night
A decent rule: if your tank is deeper than it is wide, or you’re pushing your bioload toward the upper end of what your filter’s rated for, add an air pump. Quiet operation matters more than raw power for most home setups — a pump that sounds like a small generator kills the whole point of having a relaxing tank in your living room. The best aquarium air pumps, quiet and powerful options guide is worth a look if noise has ever been a dealbreaker for you.
Lighting: Picking the Right Watts and Spectrum
Lighting is the one category where tank size genuinely takes a back seat to what’s actually living in the tank. Fish-only tanks need barely any light — just enough to see your fish and stop the tank looking like a swamp. Planted tanks are a completely different conversation.
For planted tanks, sizing by watts-per-gallon is outdated — PAR (Photosynthetically Active Radiation) is what actually matters, since modern LEDs vary wildly in efficiency per watt. As a rough starting point:
- Low-light plants (anubias, java fern, moss): 20–40 PAR at substrate level
- Medium-light plants (swords, crypts): 40–60 PAR
- High-light, CO2-injected planted tanks: 60–100+ PAR
Depth changes this math a lot — a light rated great for a 12″ deep 20-gallon might barely reach the substrate of a 24″ deep 55-gallon. Always check the manufacturer’s PAR chart at your actual tank depth, not just the “suitable for X gallon tanks” sticker.
If you’d rather not eyeball it, the aquarium lighting calculator does the depth-and-intensity math for you, which honestly saves a lot of trial and error (and a lot of algae blooms from overshooting).
Speaking of algae — this is the #1 lighting mistake I see. People assume brighter is always better, crank the intensity up, and end up fighting algae for months. More light without matching nutrients and CO2 just feeds algae faster than it feeds your plants. If you’re running a proper planted tank, lighting decisions should never happen in isolation from your CO2 setup, which we’ll get into next.
For species-specific needs, plant-heavy tanks housing shade-loving fish like angelfish often do better with lower, more diffused lighting anyway — closer to their natural blackwater habitat than a bright, high-tech reef-style setup.
CO2 Systems: Sizing for Planted Tanks
If you’ve got live plants and you’re chasing faster growth, CO2 injection is usually the next step — but sizing it wrong is one of the fastest ways to accidentally gas your fish. Not exaggerating, this is a genuinely important one to get right.
CO2 sizing depends on tank volume, bubble rate, and how much surface agitation is pulling it back out (see the air pump section above — they’re directly connected):
| Tank Size | Starting Bubble Rate (approx.) |
|---|---|
| 10–20 gallons | 1 bubble/second |
| 30–55 gallons | 1–2 bubbles/second |
| 75+ gallons | 2–3 bubbles/second |
These are starting points only — every tank differs based on plant mass, lighting intensity, and how much your air pump or filter is agitating the surface. The real target isn’t a bubble count at all, it’s a stable pH drop of about 1 point from your degassed baseline, checked with a drop checker rather than guessed at.
Timing matters just as much as rate. CO2 should run on a timer that switches on an hour or two before lights come on, and off an hour before lights go off — running it 24/7 wastes gas and risks suffocating fish overnight when plants aren’t photosynthesizing and can’t use it.
For anyone building out a proper planted tank from scratch, the best CO2 systems for planted aquariums comparison walks through pressurized versus DIY setups and which actually holds a stable rate long-term (DIY yeast systems are fun to build but notoriously inconsistent — fair warning).
Thermometers, Feeders and the Small Stuff People Forget
Everyone obsesses over filters and heaters, then completely forgets the gear that actually tells you whether the big stuff is working. A heater with no reliable thermometer is basically a guess with a plug on it.
Thermometers: Every tank needs at least one, positioned away from the heater and filter outflow so it reads the ambient tank temperature, not a hot or cold spot. Tanks over 40 gallons genuinely benefit from two — one at each end — since larger volumes can develop surprisingly uneven temperature zones. Digital probe thermometers tend to be more accurate than the cheap stick-on strip kind, which can drift by a couple of degrees without you ever knowing. The aquarium thermometers guide compares accuracy across the common types if you’ve ever wondered whether your stick-on strip is lying to you (it might be).
Automatic feeders: Not strictly “sizing” gear in the traditional sense, but worth mentioning here because portion size absolutely needs to scale with tank population, not just fish count. A feeder set for a 10-fish community tank will badly overfeed a lightly stocked 55-gallon, and overfeeding is one of the most common causes of the filtration problems people blame on “bad equipment.” The automatic fish feeders roundup covers portion control features worth looking for.
A few other small but easy-to-overlook essentials:
- A gravel vacuum sized to your tank depth (shorter tubes struggle in deep tanks)
- A spare thermometer battery on hand — nothing worse than a dead display during a heatwave
- A backup air pump or battery-powered pump for power outages, especially on heavily stocked tanks
None of this stuff is exciting to shop for, but it’s usually the small, cheap gear that catches problems before they become expensive ones.
How Your Fish Choice Changes Your Equipment List
Here’s the part most generic sizing guides skip entirely: your gallon-based formulas are a starting point, not a finish line. What’s actually swimming in the tank shifts every single number we’ve covered.
A few real examples worth knowing before you buy:
- Bettas hate strong current — even a “correctly sized” filter for their tank volume can be too aggressive without a flow baffle
- Oscars and other monster fish produce so much waste that filtration should run at the top of the range, or beyond it, regardless of what the calculator says
- Discus need rock-solid, stable heating — this is where dual heaters stop being optional and start being essential
- Corydoras and other bottom feeders benefit from extra surface agitation since they spend most of their time in the lowest-oxygen part of the tank
- Mixed community tanks — check out peaceful community fish combinations if you’re stocking a mixed tank — often need a middle-ground setup that doesn’t overwhelm the most sensitive species while still handling the messiest one
If you’re planning a stocking list before buying equipment (genuinely the right order to do it in, IMO), it’s worth browsing the wider aquarium fish care library first so your gear choices match the actual bioload you’re aiming for, rather than retrofitting equipment after the tank’s already stocked. And if you want a single reference that ties tank volume directly to equipment recommendations across the board, the tank capacity and equipment guide is built specifically for that.
Frequently Asked Questions
Do I really need to size equipment by actual water volume, not the tank’s listed gallons?
Yes. Substrate, decorations and rock displacement can eat up 10–15% of a tank’s listed volume, which matters more than you’d think once you’re near the edge of a sizing bracket.
Can I use one filter that’s rated for a much bigger tank than mine?
You can, but check the flow rate against your fish first — an oversized filter on a tank with weak swimmers can create current strong enough to stress or exhaust them.
How do I know if my heater is too small?
If it runs constantly and still can’t hold your target temperature during colder months, it’s undersized — bump up the wattage or add a second heater.
Do I need an air pump if I already have a filter?
Not always. If your filter output already breaks and agitates the surface, you likely have enough gas exchange. Deep or heavily stocked tanks usually benefit from one anyway.
Does lighting need to scale with tank size the same way filters do?
No — lighting should scale with your plants’ needs and tank depth (via PAR), not gallons. A fish-only tank needs a fraction of the light a high-tech planted tank does.
Is DIY CO2 a safe alternative to pressurized systems?
It works for smaller tanks but is notoriously inconsistent — bubble rates drift as fermentation slows, which makes stable sizing much harder to maintain long-term.